
ESP32 Web Server Example

This article shows an example of a simple ESP32-based web server, written in the Arduino IDE to manage two loads, in this case, LEDs.
you Can read Getting Started with ESP8266 NodeMcu v3 Lua with WiFi
In order to program ESP32 using the IDE Arduino and the Arduino programming language , you will need a special addon. How to prepare the Arduino IDE to work with ESP32 on Windows , read here , and on Mac and Linux - here .
Code download
Copy the text below into the Arduino IDE workspace :
/ *
* Author - Rui Santos (Rui Santos)
* More details about the project at: http://randomnerdtutorials.com
* /
#include <WiFi.h>
// replace the values in these constants with those
// that correspond to your network :
const char * ssid = "YOUR_SSID";
const char * password = "YOUR_PASSWORD";
WiFiServer server (80);
const int led1 = 16; // contact for the first LED
const int led2 = 17; // contact for the second LED
// variables for the client:
char linebuf [80];
int charcount = 0;
void setup () {
// initialize contacts for LEDs
// and put them in OUTPUT mode:
pinMode (led1, OUTPUT);
pinMode (led2, OUTPUT);
// initialize the serial communication
// and wait for the opening of the port:
Serial.begin (115200);
while (! Serial) {
; // wait for the serial port connection
// (needed only for a regular USB port)
}
// start with connecting to the WiFi network:
Serial.println ();
Serial.println ();
Serial.print ("Connecting to"); // "Connect to"
Serial.println (ssid);
WiFi.begin (ssid, password);
// trying to connect to a wifi network:
while (WiFi.status ()! = WL_CONNECTED) {
// connect to the WPA / WPA2 network; change this line,
// if you are using an open or WEP network:
delay (500);
Serial.print (".");
}
Serial.println ("");
Serial.println ("WiFi connected"); // "Connection
// via WiFi done"
Serial.println ("IP address:"); // "IP address:"
Serial.println (WiFi.localIP ());
server.begin ();
}
void loop () {
// analyze the communication channel, looking for incoming clients:
WiFiClient client = server.available ();
Serial.println ("New client"); // "New client"
memset (linebuf, 0, sizeof (linebuf));
charcount = 0;
// HTTP request ends with an empty line:
boolean currentLineIsBlank = true;
while (client.connected ()) {
if (client.available ()) {
char c = client.read ();
Serial.write (c);
// read the HTTP request, character by character:
linebuf [charcount] = c;
if (charcount <sizeof (linebuf) -1) charcount ++;
// if we got to the end of the line (i.e., got a
// newline character) and the line is empty,
// this means that the HTTP request has ended;
// therefore, you can send a response:
if (c == '\ n' && currentLineIsBlank) {
// send the standard HTTP response header:
client.println ("HTTP / 1.1 200 OK");
client.println ("Content-Type: text / html");
// "Content Type: text / html"
client.println ("Connection: close");
// "Connection: disabled";
// after sending the reply, the connection will be disabled
client.println ();
client.println ("<! DOCTYPE HTML> <html> <head>");
client.println ("<
client.println ("<h1> ESP32 - Web Server </ h1>");
client.println ("<p> LED # 1 <a href=\"on1\"> <button> ON </ button> </a> & nbsp; <a href=\"off1\"> <button> OFF < / button> </a> </ p> ");
client.println ("<p> LED # 2 <a href=\"on2\"> <button> ON </ button> </a> & nbsp; <a href=\"off2\"> <button> OFF < / button> </a> </ p> ");
client.println ("</ html>");
break;
}
if (c == '\ n') {
// start a new line:
currentLineIsBlank = true;
if (strstr (linebuf, "GET / on1")> 0) {
Serial.println ("LED 1 ON");
digitalWrite (led1, HIGH);
}
else if (strstr (linebuf, "GET / off1")> 0) {
Serial.println ("LED 1 OFF");
digitalWrite (led1, LOW);
}
else if (strstr (linebuf, "GET / on2")> 0) {
Serial.println ("LED 2 ON");
digitalWrite (led2, HIGH);
}
else if (strstr (linebuf, "GET / off2")> 0) {
Serial.println ("LED 2 OFF");
digitalWrite (led2, LOW);
}
// start a new line:
currentLineIsBlank = true;
memset (linebuf, 0, sizeof (linebuf));
} else if (c! = '\ r') {
// a new character was caught in the line:
currentLineIsBlank = false;
}
}
}
// give the web browser time to get the data:
delay (1);
// close the connection:
client.stop ();
Serial.println ("client disconnected"); // "client is disabled"
}
}
Do not forget to specify the data corresponding to your network. This is done at the very top of the sketch in the ssid and password constants .
Now connect the ESP32 to the computer and follow the instructions below:
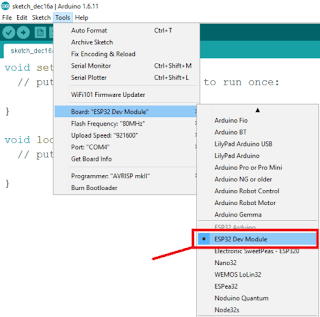
Select your board in Tools> Board (Tools> Board) . In this case, it is "ESP32 Dev Module" :
Select a COM port.
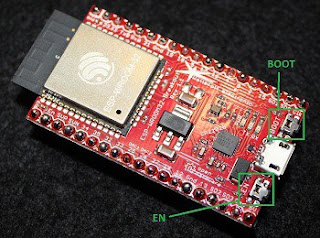
To put ESP32 into the firmware download mode, hold down the BOOT button and press the EN button . This will restart ESP32 .
Click the Download button in the Arduino IDE and wait a few seconds for the code to compile and load onto the board. If everything was done correctly, you should see something like the following:

Restart ESP32 again to start the new firmware.
Necessary components and scheme
Below is a list of components required for our project:
- One ESP32 module
- Two LEDs
- One breadboard
- Two 270 Ohm resistors
- Jumper wires
Connect all these components to each other as shown in the picture below:

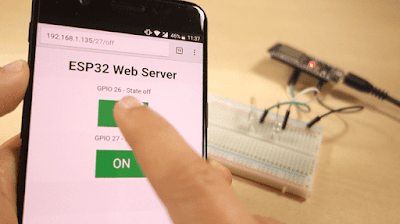
Web server access
After restarting , ESP32 will print its IP address in the monitor of the Arduino IDE port . The baud rate must be set to 115200 baud .

Now, to get access to the web server, you need to type in the address bar of the browser IP- address , which ESP32 printed in the monitor port IDE Arduino . In this case, it is "192.168.1.116" .

Using the buttons in the browser, try turning on and off the LEDs connected to the ESP32 module . In the future, instead of LEDs, you can connect any load via transistor switches or relays.
Comments: 0
Post a Comment